
DIY audiophile speaker plans – Floor standing MTM
Let’s build an awesome pair of speakers
In this article you will find the plans for a DIY audiophile speaker, a floor standing speaker in our case. I won’t post instructions about the building, as you can watch a video about how I built it, but rather all the numbers and details of the project. This build has a upgrade. Go ahead and follow that article as well:
- 1st iteration blog post (you’re already here)
- 1st iteration YouTube video
- 2nd iteration blog post
- 2nd iteration YouTube video
Parts list
Next, I will list all the components that you need. I will also link the items. Links contain sources from both Europe and US :
Following table contains affiliate paid links
| Item | US | Europe |
| SEAS CA18RNX (x4) | MadiSound | Sound Imports |
| Morel CAT408 (x2) | Parts Express | Sound Imports |
| Precision Sound 4″ (x2) | Parts Express | Sound Imports |
| Damping material | Parts Express | Sound Imports |
| Dayton Audio Binding Post (x2) | Parts Express | Sound Imports |
| Perforated Crossover Board (x2) | Parts Express | Sound Imports |
| Air Core Inductor 1,2 mH | 18 AWG (x2) | Parts Express | Sound Imports |
| Film foil capacitor 6,80 µF (x2) | Parts Express | Sound Imports |
| Film foil capacitor 8,20 µF (x2) | Parts Express | Sound Imports |
| Air core inductor 0,22 mH| 18 AWG (x2) | Parts Express | Sound Imports |
| Film foil capacitor 22 µF (x2) | Parts Express | Sound Imports |
| Screw Terminals For PCB mounting (x2) | Amazon | Sound Imports |
Now, of course these items are not set in stone (except for the speakers). You can go for more expensive items for the crossover board, or use other binding posts etc. We’re going to get to those, and talk about them individually with more details.
The box
First of all, to make this awesome DIY audiophile speaker, you need to make the box. The material I used is 18 mm thick MDF. The baffle is made by a single panel. I placed 4 bracers inside, therefore I don’t feel the need to increase the thickness of the baffle.
Here are the dimensions of the panels :
- Front and back : 1012 x 242 mm (4 pieces)
- Top and bottom : 242 x 239 mm (4 pieces)
- Sides : 976 x 239 mm (4 pieces)
- Brace : 239 x 206 (8 pieces)
The brace is basically a small panel which we will cut a rectangular hole in it to make a frame. That we will be using for bracing the box. I’m assuming that you watched the YouTube video, as I’m not going into much detail here.
The front and back panel
These 2 panels are the only ones which you need to do some cutting. Except for the bracers. So, you need to know which speaker goes where.
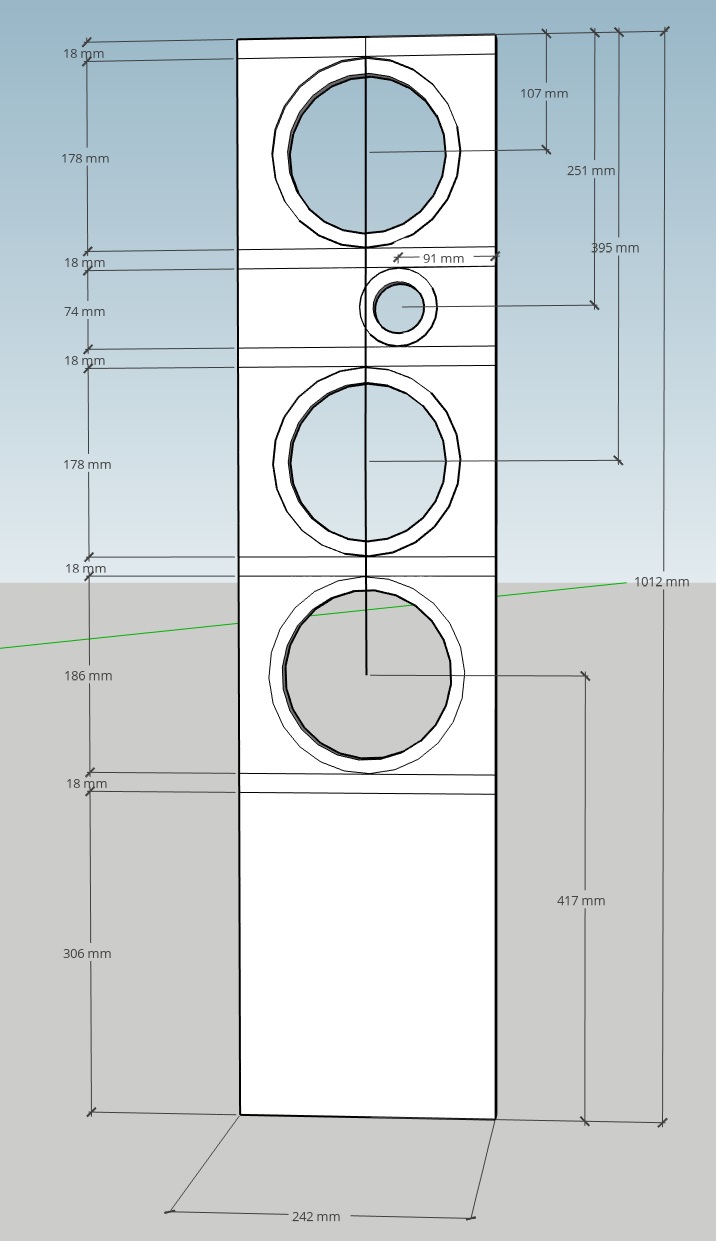
Above we have the front panel with all of the necessary dimensions and positions. The large speakers and port are placed in the middle and the tweeter is slightly offset. Make sure you offset the tweeter on the other side for the 2nd speaker. Otherwise it will look awkward, as there is no symmetry. You can get the dimensions of the speakers from their spec sheets, but I’m assuming you are going to use the Jasper circle jig and I’m going to you give those numbers. One will be for the step (for flush mounting) and another for the actual mounting hole :
- Seas CA18RNX – 7″ for step and 5″ + 13/16″ hole
- Morel CAT 408 – 2″+14/16″ for step and I used a 48 mm drill bit for the hole
- Precision port 4″ – 7″+5/16″ for step and 6″+5/16″ for hole
The Jasper jig usually uses a 6 mm knife. Therefore, when you do the flush mount hole for the woofer, you make a pass (as deep as the thickness of the speaker frame) of 7″ diameter. And then make several smaller in diameter passes until you reach the 5″+13/16 mark, where you make the actual hole.
For the back panel you just have to make the holes for the binding posts. The position ain’t important as long as it’s in the lower chamber. As a result, grab your 9 mm drill bit and drill where you find it most pleasing 2 holes.
The bass reflex port
Even though you could use whatever 4″ port, I suggest using a Precision port. You simply throw away the pipe and keep the 2 flares and connect them to one another by using a ring. Furthermore, you can use some ABS plastic glue, to connect these pieces together, to make sure the pipe doesn’t fall apart or start rattling.
If you are wondering what the tuning frequency is, it’s at 50 Hz. If you are wondering why such a large port? It’s because the box permits this size. Normally, you would be forced to use a smaller diameter, as the length requirements are too great. However, in this case, even for a 4″ port, the length requirements are small. As a result, a highly encourage to use a larger port instead of a smaller one.
Damping material
As you saw in the video, I fill the bottom chamber with damping material. This is not for show, and it’s not optional. Most of the time, when you are building tower speakers, there is enough room for standing waves to develop. In this particular case, there is one present at 700 Hz. By filling the lower chamber with damping material, we reduce the effect of the standing wave to a level which I’m comfortable with. If you want to completely eliminate it, you probably need to line all the walls with mineral wool. Don’t really think that’s necessary.
Crossover
The crossover is a simple 3rd order filter for the tweeter and a 2nd order filter for the woofers. The woofers are wired in parallel. I made this crossover in a previous video of mine and also show how I like to assemble the board. As a result, if you want to watch those, you can go ahead and check it out here and here. Furthermore, if you want to learn more about how to design a crossover you can check out this article. 
The crossover point is around 2.5 kHz and the tweeter will work safely. You can use whatever components you see fit. However, for this DIY audiophile speaker I would suggest air core coils and film foil capacitors. There aren’t many components and this shouldn’t break the bank. The 22 uF cap might be a bit expensive.
DIY audiophile speaker conclusion
These are a wonderful pair of speakers. They will surprise you with how much detail they have. Also, they have a trait of which I’m not really fond of, but some of you might be. Even though they sound good at a moderate level, you can crank them up to ear bleeding levels (if you are into that stuff). Let’s look at the frequency response :

In conclusion, this speaker has a very flat frequency response, sounds great and I encourage people to build a pair if they plan to build some DIY audiophile speakers. Furthermore, if you know what you are doing with applying a finish to these boxes (whatever that might be), it will look awesome in any living room.
You May also Like


Learn loudspeaker design from scratch

43 comments
Salut Marius,Jigul de la router (freza) este confectionat sau cumparat?
Multumesc!
E cumparat https://www.soundimports.eu/en/accessories/circle-jigs/
Salut,
Unde tai MDF-ul in Bucuresti? Proectul este super!Mult succes in continoare.
Salut! MDF-ul il cumpar gata taiat de la Holver. Doar ca te obliga sa iei o placa intreaga, care are aprox 6 m2. Iti taie bucatile care iti trebuie si iti trimite si restul de placa.
din ce am vazut la holver trebuie sa ai firma sa faci comenzi. 🙁
Merge si ca persoana fizica. Am comandat eu. Completezi formularul ca datele tale chiar daca sunt rubrici de firma.
Salut Marius si iti multumesc pentru timpul si cunosintele tale pe care ni le daruiesti gratuit.
As avea 3 intrebari sa iti pun, deoarece vreau sa fac acest proiect al tau:
1. Am vazut ca material absorbant ai pus foarte putin si numai in zona bassului.
Daca gresesc te rog a ma corectezi. Daca este asa, nu mai este necesar umplerea incintei cu material/ sau pe pereti, se lasa asa goala ? Adica nu s-ar imbunatati sunetul cu incinta umpluta ? Sau datorita caracteristicilor difuzoarelor care nu produc unde stationare si coloratura sunetului nu este nevoie ?
2. Ce materiale de umplere ai recomanda ?
3. Ai folosit MDF poate pentru un cost rezonabil. Daca s-ar folosi placi HDF sau OSB cu densitati mai mari , ar fi mai bun sunetul, datorita rigiditatii mai mari ?
multumesc anticipat…
1) Am pus doar acolo jos pentru ca este usor de facut. Daca stai sa pui pe toti peretii este mai greu. Si unda stationara s-a ameliorat destul cat sa nu trebuiasca mai mult. O incinta bass reflex nu poti sa o umpli, poti sa pui doar straturi pe pereti. Daca nu ai probleme cu unde stationare (dar de obicei ai probleme in incinte lungi ca astea mari de podea), eu vad materialul absorbant total facultativ.
2) Depinde ce frecvente creeaza probleme. Cu cat frecventele sunt mai joase, cu atat trebuie material mai dens. De exemplu, ala de arata precum cofrajul de oua dar din burete, e degeaba. Absoarbe doar frecvente inalte. Daca vrei ceva care sa mearga si la frecvente joase poti sa folosesti vata minerala.
3) In primul rand OSB-ul sigur nu e mai dens ca MDF-ul. In al doilea rand, MDF e super bun pt incinte. E dens, suprafata fina, il frezezi cum vrei (nu ca placajul). Are si el dezavantajele lui. Dar, nu vad de ce as folosi HDF. Daca incinta rezoneaza inseamna ca trebuie intarita la interior sau folosit material mai gros. MDF-ul e super ok.
Dear Marius
Are you sure you are using 18mm MDF and not 19mm?
I’m asking cause i can not find any 188mm sheet in my country only 19mm
Kind Regards
Hello
Yes, I use 18 mm MDF. In my country it’s the opposite. It’s difficult to find 19 mm.
Can you please verify that the net internal dimensions are
H976*W206*D203
(40.814368 Liters)
Thanks in advance
976 x 206 x 239
That’s 48 liters if you make the multiplication. However, you have to subtract the volume displaced by the speakers, port brace, crossover, to get the net internal volume.
What is the recomended amplifier for these speakers ?
100W at 4 ohm
Any brand in particular that you would recommend?
Will a thin layer of dynamat or stp help the overall performance?
Do you have some other suggestions for better quality parts on the crossover ?
Thnx in advance
The crossover has a few components and using air core inductors and film caps is good enough. Using a layer of STP on the inside can’t be bad, but a double baffle will have more impact. Or use both.
Hello Marius!
First of all thank you for sharing these awesome speakers with us! I appreciate your work!
Due to small living room i would like to build bookshelf speakers from these speakers, But leave one bass driver paired with the tweeter! Later one in some time when i move to a bigger house i would like to upgrade bookshelf speakers to these floorstanding speakers! What do you think, this would be a bad idea? And if no then could i keep this crossover without loosing much all the good sound?
Unfortunately, no. The crossover won’t work. You need a completely new crossover.
The SEAS CA18RNX are no longer available. Can you suggest replacements?
Nope, you need precisely that speaker. Contact the shop and ask them when they will have it on stock.
Soundimports now also sell this speaker: https://www.soundimports.eu/nl/seas-ca18rnx.html
Hi Marius,
I see your not using any gasketing tape or other material to seal the ‘space’ between the woofers and the cabinet, is that not necessary you think? Any change the screws might get loose over time because of the vibration without the tape? Love to hear your thoughts on this.
And one other question, what type of screws did you use. I see the screw heads really stick out. I think I would prefer to have them not stick out at all, but I can’t find screws with small heads, especially the Morel has a really small space on the tweeter for the screw head to get into.
Thank you for this great tutorial!
I use these screws : https://www.soundimports.eu/en/monacor-mzf-8614.html
An I don’t use gasketing tape because the speakers have gaskets pre-attached to it. Some cheaper speakers, dont.
I already have the CA18RNX speakers. I assume you want an airtight connection between the speaker and the cabinet, no air leaks in places where you don’t want them right? So isn’t it a good idea to put some tape between the outer ring of the speaker (the gasket) in which you also put the screws to tighten it, and the cabinet? Otherwise it would be the mdf directly on the metal of the outer ring of the speaker as it’s also shown in your video. I have no experience in this, is that solution good enough?
Yeah, it’s a great idea to use some sort of gasket between the speaker and the cabinet. But many speakers come with some sort of foamy gasket pre-applied. Can’t remember if the seas speaker has one, or it’s just bear metal.
Thank you for the reply. The seas speakers don’t have a foamy gasket, it’s indeed just metal. You can actually see it in your video about this speaker at the 15:21 time mark. 🙂
I already have almost all the material I need to build this. Will post a link to a picture when I’m done.
Hi Marius,
Thanks for all your tons of information and guidance on DIY speakers!!
Regarding these plans – Do you know any commercial speakers you would compare these to?
Also – do you know of any others who have built speakers using these plans who can write about their experiences building them and how they sound?
My experience with commercial speakers is quite limited so I can’t help you there. Nor do I know someone who built them. The links in the article are affiliate links and I have saw quite a few people who bought the whole list of parts (as I receive a small commission if someone makes a purchase using my link). I’m sure they already built them, but I don’t know who they are and unless they take the initiative to leave a review, we just have to wait for another opinion.
Thanks Marius. I really appreciate you posting these plans!
If anyone reading this actually built the speakers please tell us what they sound like and what you would compare them to if you know.
Hi Marius And Hi people who are learning from Marius! I can finnaly say that i have built these speakers. And yes, they sound amazing! They costed me +/- 700£. Some people comparing them to speakers that costs twice that money. They are crisp and clean, thight base, tweeter is not biting in ears and no need to adjust the equalizer. I leave it flat on yamaha as501 amp and sounds just right for my ears. Base is tight but doesn’t go deep, so i think subwoofer is a must if you want deeper! If i am right even Marius added his white transmision line subwoofer to these speakers! Ower all these are wonderfull pair of speakers i can recomend them if you want a great audiophile speakers for a very little money!
Enjoy building!
That’s awesome! I’m humbled that people actually build my design. So glad that you like them.
Awesome to read this! I’m planning on building the speakers myself, but I don’t want to add a subwoofer.
Now, I don’t need the bass to go extremely deep. However, I listen a lot of rock and metal, and want at least the drum parts to have a nice raw kick. Would you say these speakers can do that?
When I listen to speakers I do have some classic rock tunes in the portfolio and they do sound good.
Seas Prestige CA18RNX has a resonance frequency of 35. Don’t you need to apply any filter to hit that frequency to avoid distortion?
Hi,I noticed that in your crossover you didn’t use any resistors,why?
Hello! There are 2 midbass drivers which are very efficient. When combined, the efficiency is a perfect match for the tweeter. Normally the tweeter is louder and needs to be attenuated. In this case, it doesn’t need to.
hi
I really appreciate your work and sharing your experience. Its really admirable.
Want to know either we can use assembled crossover and which one you recommend
to use in this case or any other options for speakers which are more capable to bring more. Thanking you in advance if you share your experience about my question.
I have built these my self using the seas ca18rnx and the tweeter I went for Seas H1318 to match the woofers used the 4 inch port same one you used only difference is there running denon cross overs at the moment as I’m struggling to find the parts to make the cross overs you suggested. Must say m8 I am very very I’m pressed with the way these speakers preform. I’m running them on a technics SU-A700 very very nice sound I have built for just under 800 pounds. Thank you so much for the amazing design. Much appreciated m8
Would this benifit from an active crossover at all? Like I assume I could apply the exact same filters but also be able to do some room correction with an fa122.
Active crossovers gives more flexibility. Most likely, it’s the better option if available.
I am retired and a newbie at building speakers and crossovers. In my younger days, i’ve owned Altec A7s and Model 19s. But now I want to build using your design. I notice that your crossover design has no resistors? Am I reading it wrong? I’ll say again, I am an absolute newbie at this and know nothing about crossovers. So, a kind explanation, and I’ll be on my way. Many thanks!
Richard
Resistors are used to lower the output of the tweeter. Usually the tweeter is louder than the bass driver. But since we have 2 bass drivers, there is a fortunate efficiency match between the low and high frequencies and no attenuation for the tweeter is needed.