
ZMA impedance file – how to make one
Generating a ZMA impedance file
If you want to make a ZMA impedance file, there are certainly several ways you could achieve this. First of all, you need a device and software to conveniently measure impedance. The most popular solutions are these 2 :
- Make a DIY measurement box and couple it to your sound card. Download measurement software (some of which is free) and make impedance measurements.
- Buy an all-in-one measurement system, that comes with hardware and software in the package.
Let’s talk about each of these categories and see which one you prefer, and what is my recommendation.
Impedance measurement solution
Let’s talk about the impedance measurement options. First, you got the measurement box. This box contains just a bunch of resistors, switches and connectors. You hook it up to your sound card, and at the other end you hook it up to the speaker you want to measure. Then, you download some measurement software like Room EQ Wizard or ARTA. First one is free, and the other one you have to pay for.
This would be the budget solution. However, in my experience, getting cheap components for the construction of the box, will yield unreliable measurements. I’m sure some of you experienced electricians can make wonders with very little, but I myself haven’t gone far. When I used high quality connectors, everything seemed to work flawlessly. Getting high quality components defeats the cheap aspect of the box.
The 2nd option is to get an all-in-one measurement solution, here are a couple of examples :
- DATS V2 – 100$ Now discontinued and replace by DATS v3 [Affiliate paid links (Amazon) (Sound Imports) (Parts Express)] which is slightly more expensive.
- CLIO Pocket – 600$
CLIO is the odd one in the list. It’s a complete package, including frequency measurements. You get a microphone also. But let’s focus on the DATS V2, the Dayton Audio Test System.

Got this image from their website so you can see what I’m talking about. It’s just a simple device, which you connect via USB and it has 2 alligator clips which you connect to the speaker. Considering the convenience and functionality, 100$ seems like a bargain. Here are some of its functions :
- Impedance and phase measurements.
- T/S parameters measurements.
- You can measure resistors, inductors and capacitors. Most multi-meters cannot measure inductors and capacitors.
- And some other functions which you probably won’t use : signal generator, oscilloscope, rub & buzz tests.
In conclusion, I think it’s a great gadget for the price, and we can generate ZMA files with it.
Calibration
Before we do the actual measurement, we need to do some calibration first. Install the software you find in the included CD. After that, on the top menu, click on “Impedance Analyzer -> Impedance calibration”

The default value is 1k Ohms, because if you were curious enough to search the box, you will find a resistor in small plastic bag. The value of that resistor is 1000 Ohms. Place the resistor between the 2 alligator clips and click OK.

Another thing we need to do is to compensate for the resistance of the leads. The wires of the device and the alligator clips themselves have their own resistance value. When we are making an impedance measurement, we don’t want to include the resistance of the leads. As a result, we need to measure their resistance and compensate for it.

Simply click “Impedance Analyzer -> Test leads calibration”. Short the leads (hook the 2 alligator clips together) and click OK.
How to measure
The whole point of making your own ZMA impedance file is to measure the drivers placed in your enclosure. The tweeter is encapsulated, so measuring it inside or outside the box should yield similar, if not identical, results. Nevertheless, measure the tweeter inside the cabinet.
How to design loudspeakers - video courses


To do so, you have several options. Let’s imagine you have a 2-way bass reflex speaker. I can see 3 main ways on how you can route the cables, so you can measure them :
- Connect the tweeter to the binding posts, from the inside of the cabinet, then connect the DATS to the outside terminals. Disconnect the tweeter and connect the bass driver in the same fashion. Make a measurement for each driver.

- Use bi-amp binding posts and you have 2 sets of terminals. No more switching around. Also, you will have an easier time to play with the crossover in the design phase.

- Route some cables from the speakers to the DATS through the bass reflex port (considering you have a bass reflex loudspeaker).


While you could get away with measuring the tweeter outside the cabinet, it’s mandatory that you measure the bass driver inside the box.
Speaker impedance measurements and generating the file
Impedance charts come in different shapes. It does not make the subject of this article, but if you are curious on how to interpret them, you can check out this article. First, let’s start with the mid-bass. Hook up the mid-bass (which is fixed to the enclosure) to the DATS alligator clips. Fire up the application and simply click “Impedance sweep”.
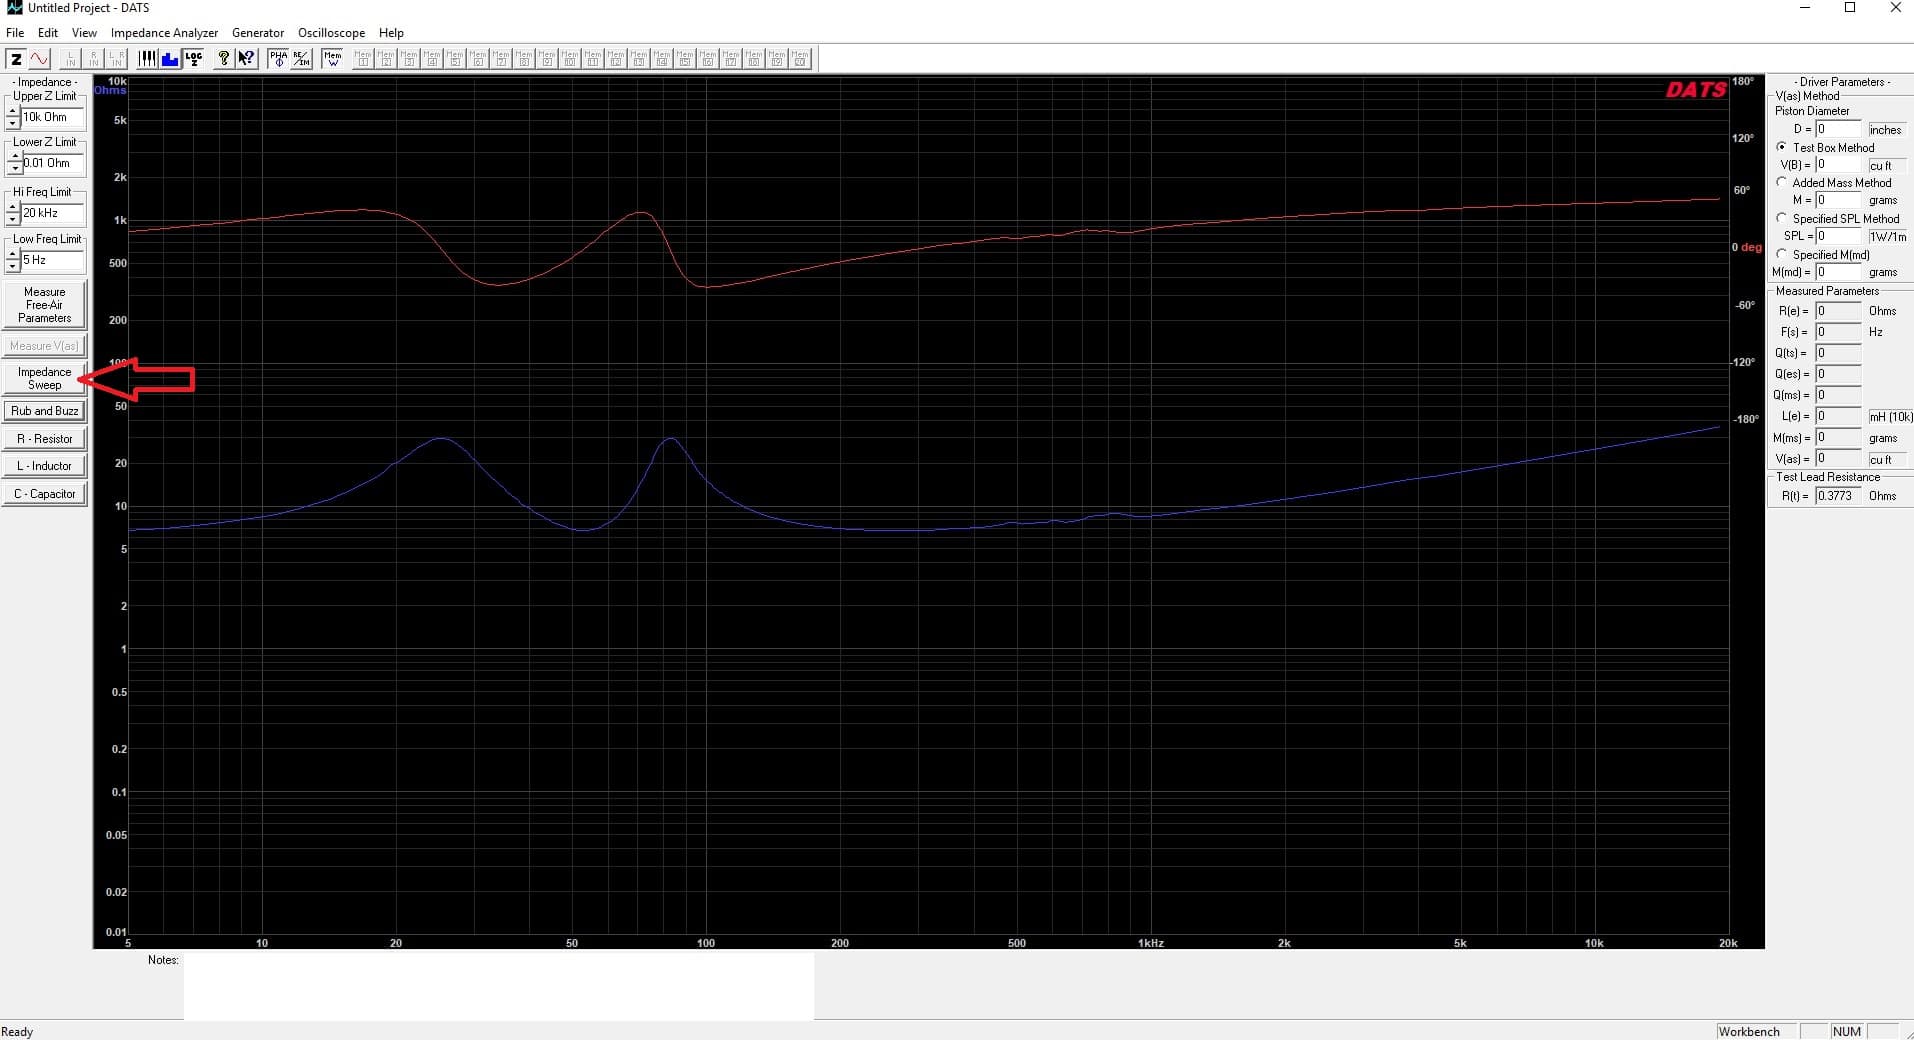
You can see the impedance graph (blue line) and the phase graph (red line). To create the ZMA impedance file, simply click “File -> Export Impedance Data -> DATS Formatted .txt or .zma”. Then input your desired file name and don’t forget to “Save as Impedance data file .zma”. And that’s all there is to it. Now do the same for the tweeter.
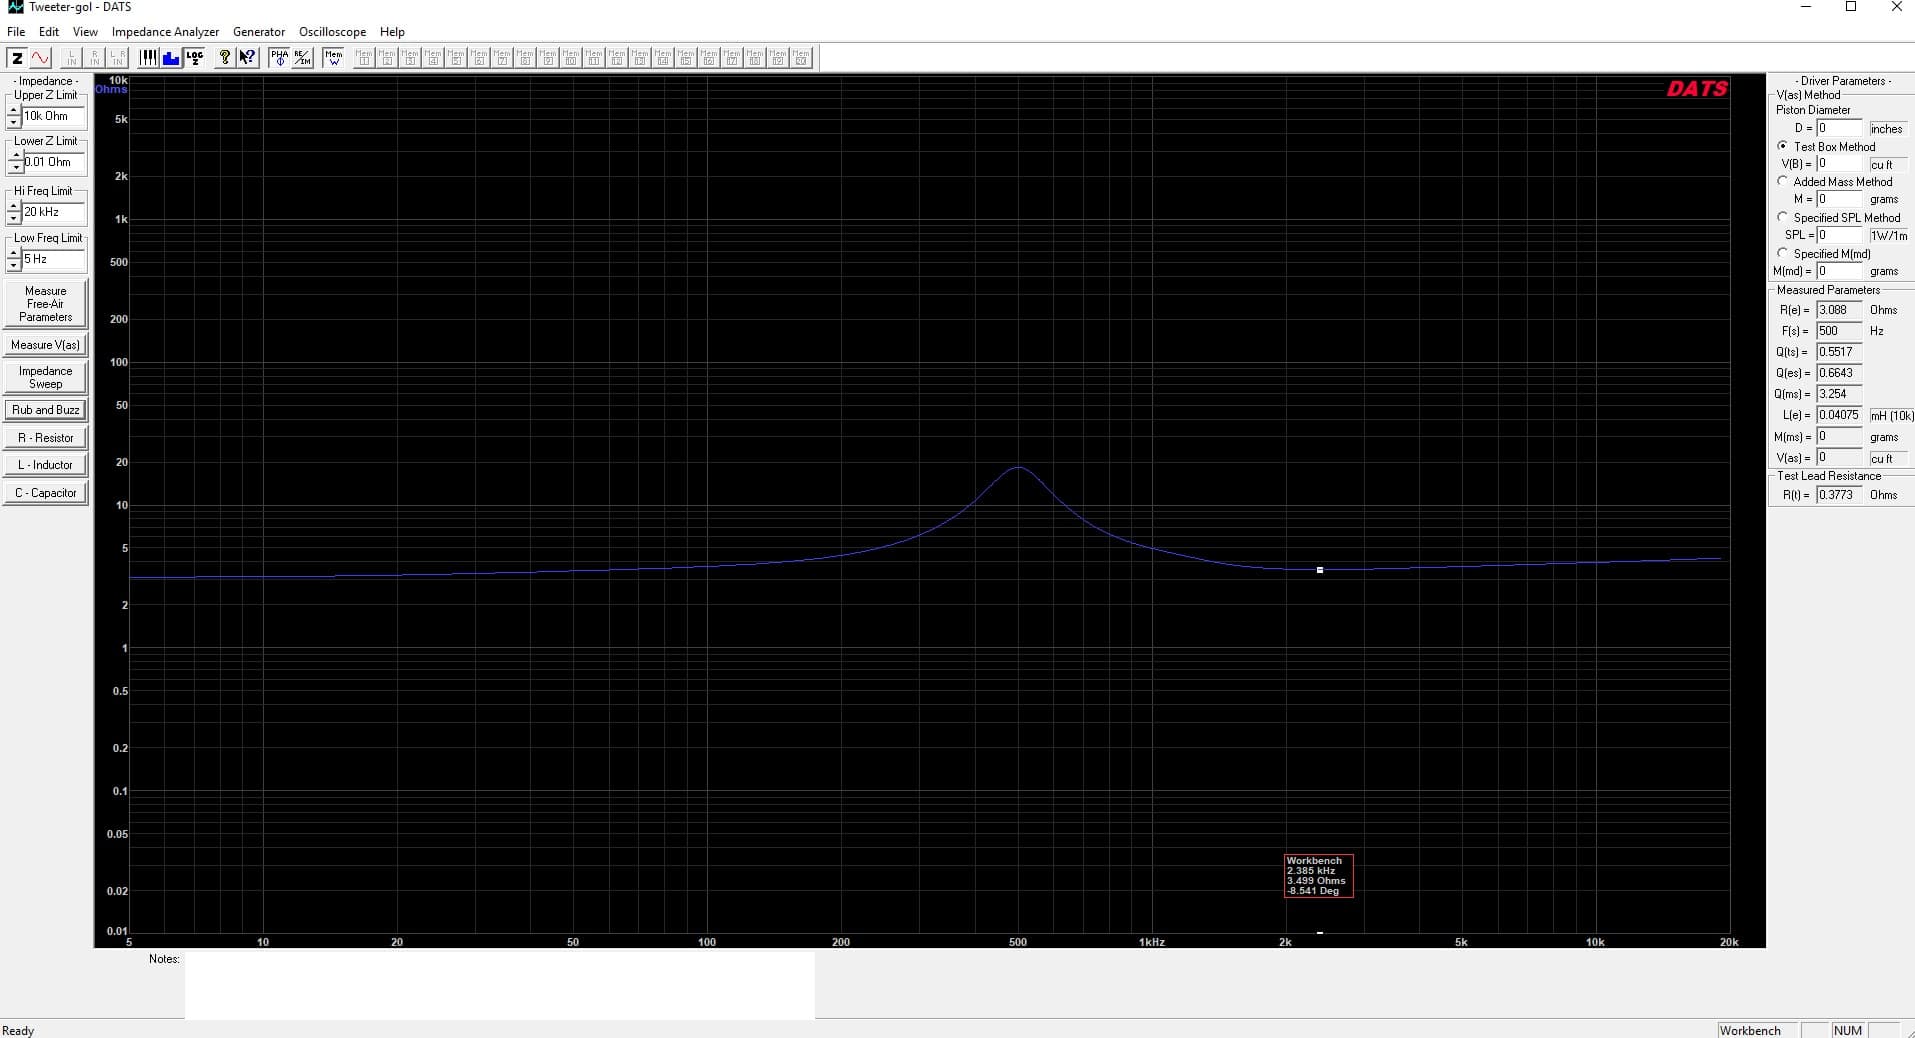
You can see that the impedance has only one peak, at the resonant frequency. The mid-bass had dual peaks, because it’s inside a bass reflex enclosure. Again, export as ZMA file, and you’re done.
Verify in XSim
You will most likely use these kind of files in a application for designing crossovers. So let’s see how they work in XSim. Let’s load the tweeter ZMA impedance file :
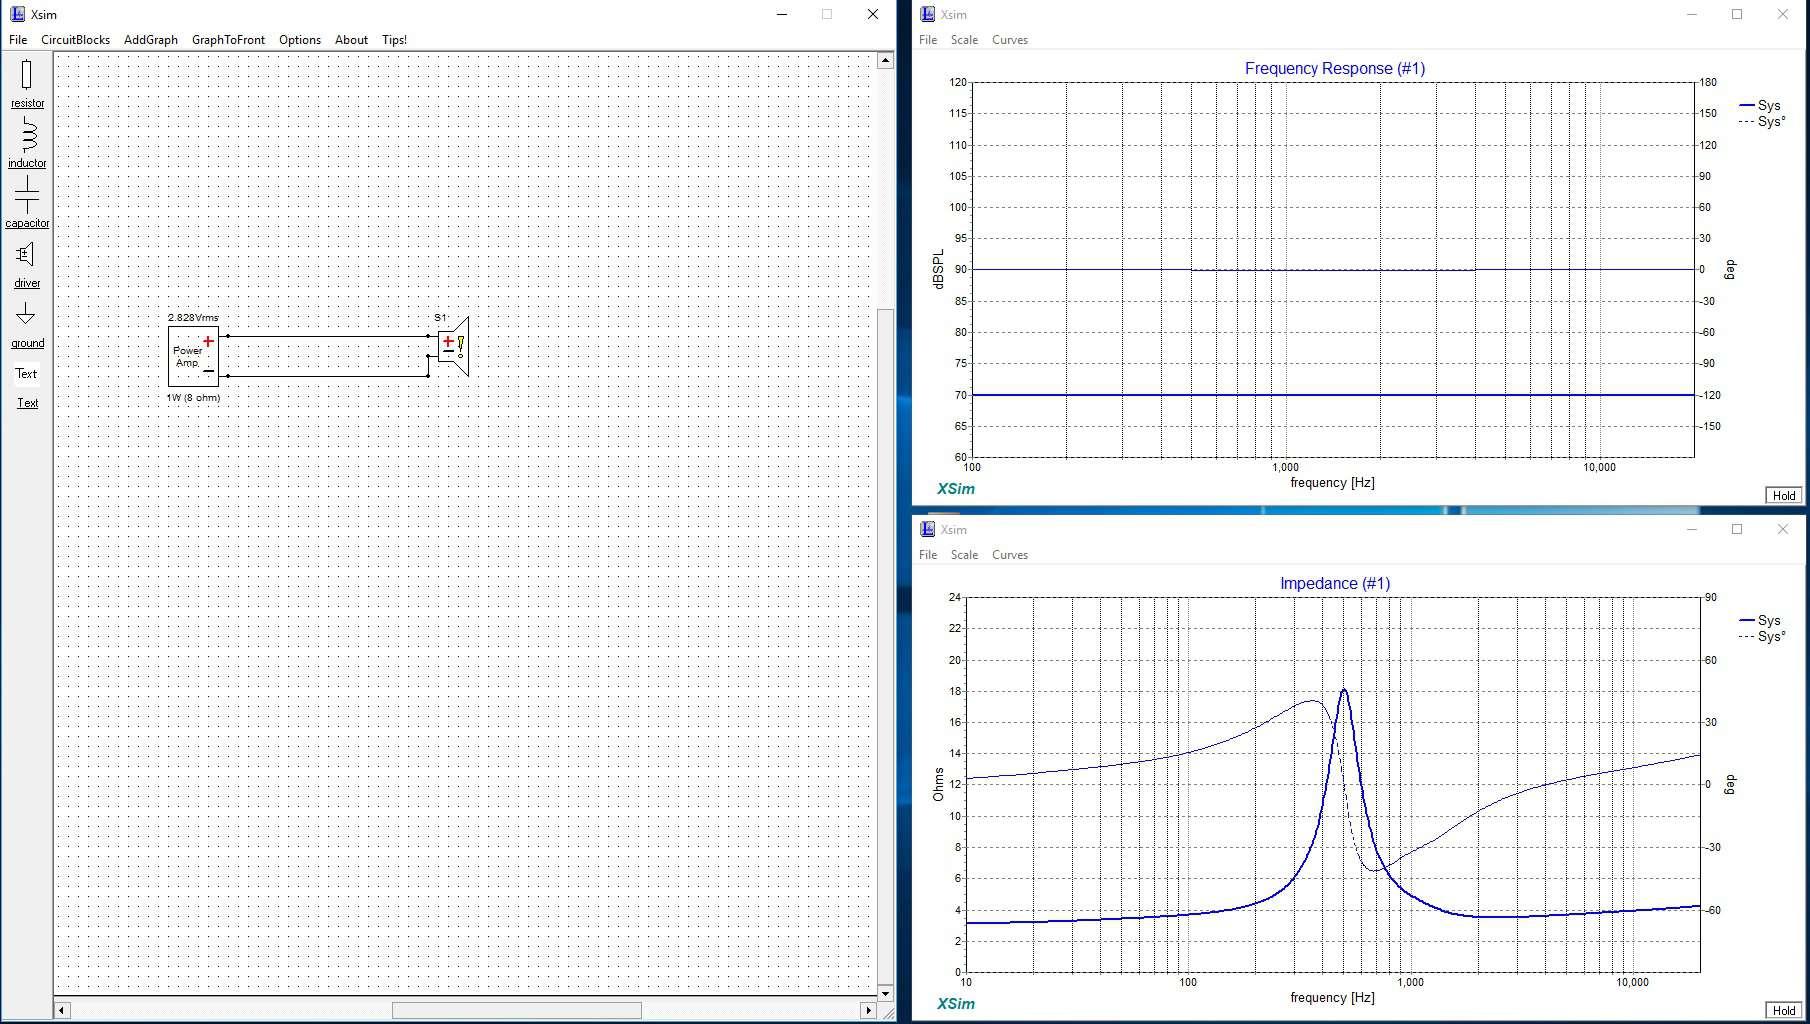
As intended, the impedance graph shows correctly, with the phase information as well.
Conclusion
There are several ways to generate a ZMA file. Some are cheaper and more DIY oriented. Others are more expensive, but provide a complete measurement package with accurate measurement results. In my opinion, The DATS system is a gadget that is a blend of many pros and few cons. It’s reasonably affordable, has many functions and it’s very convenient. Besides all the things it can do, most importantly, it can easily generate a ZMA impedance file.
References
- Image source : link.
You May also Like


Learn loudspeaker design from scratch

2 comments
This is a great Blog, good work, very useful. Thank you.
Great info, thanks for sharing! I’ve tried this method with great results. I’ve personally not tried this method yet but it seems like its worth a try.